
# unicloud-map 云端一体组件 uni-app
# 介绍
基于地图的位置服务,是移动应用的特色场景,但过去开发一个地图类应用非常麻烦。需要对接地图厂商的客户端API、服务器API,再编写自己的业务逻辑。
unicloud的MongoDB数据库,对地理位置查询,提供了比传统数据库更方便的GEO查询方案,比如可以直接查询附近的POI信息。(Point of Interest,地图上的兴趣点)
DCloud之前已推出各种云端一体组件,基于datacom规范,组件在客户端可以直接连数据库。
现在进一步封装了地图的datacom组件,将前端地图组件和云端数据库连起来,只需写一个<unicloud-map>组件,就可以直接从数据库里拉出附近的POI信息,并显示在地图上。
在uni-admin中,还提供了POI编辑插件,可以在管理端可视化的标记POI。标记的结果存入opendb表,客户端的<unicloud-map>组件可以自动直接拉取。
本文是<unicloud-map>组件的文档,admin插件文档另见
unicloud-map云端一体组件,主要用于显示数据库里的自定义POI,渲染在地图上。具体可以实现如下功能:
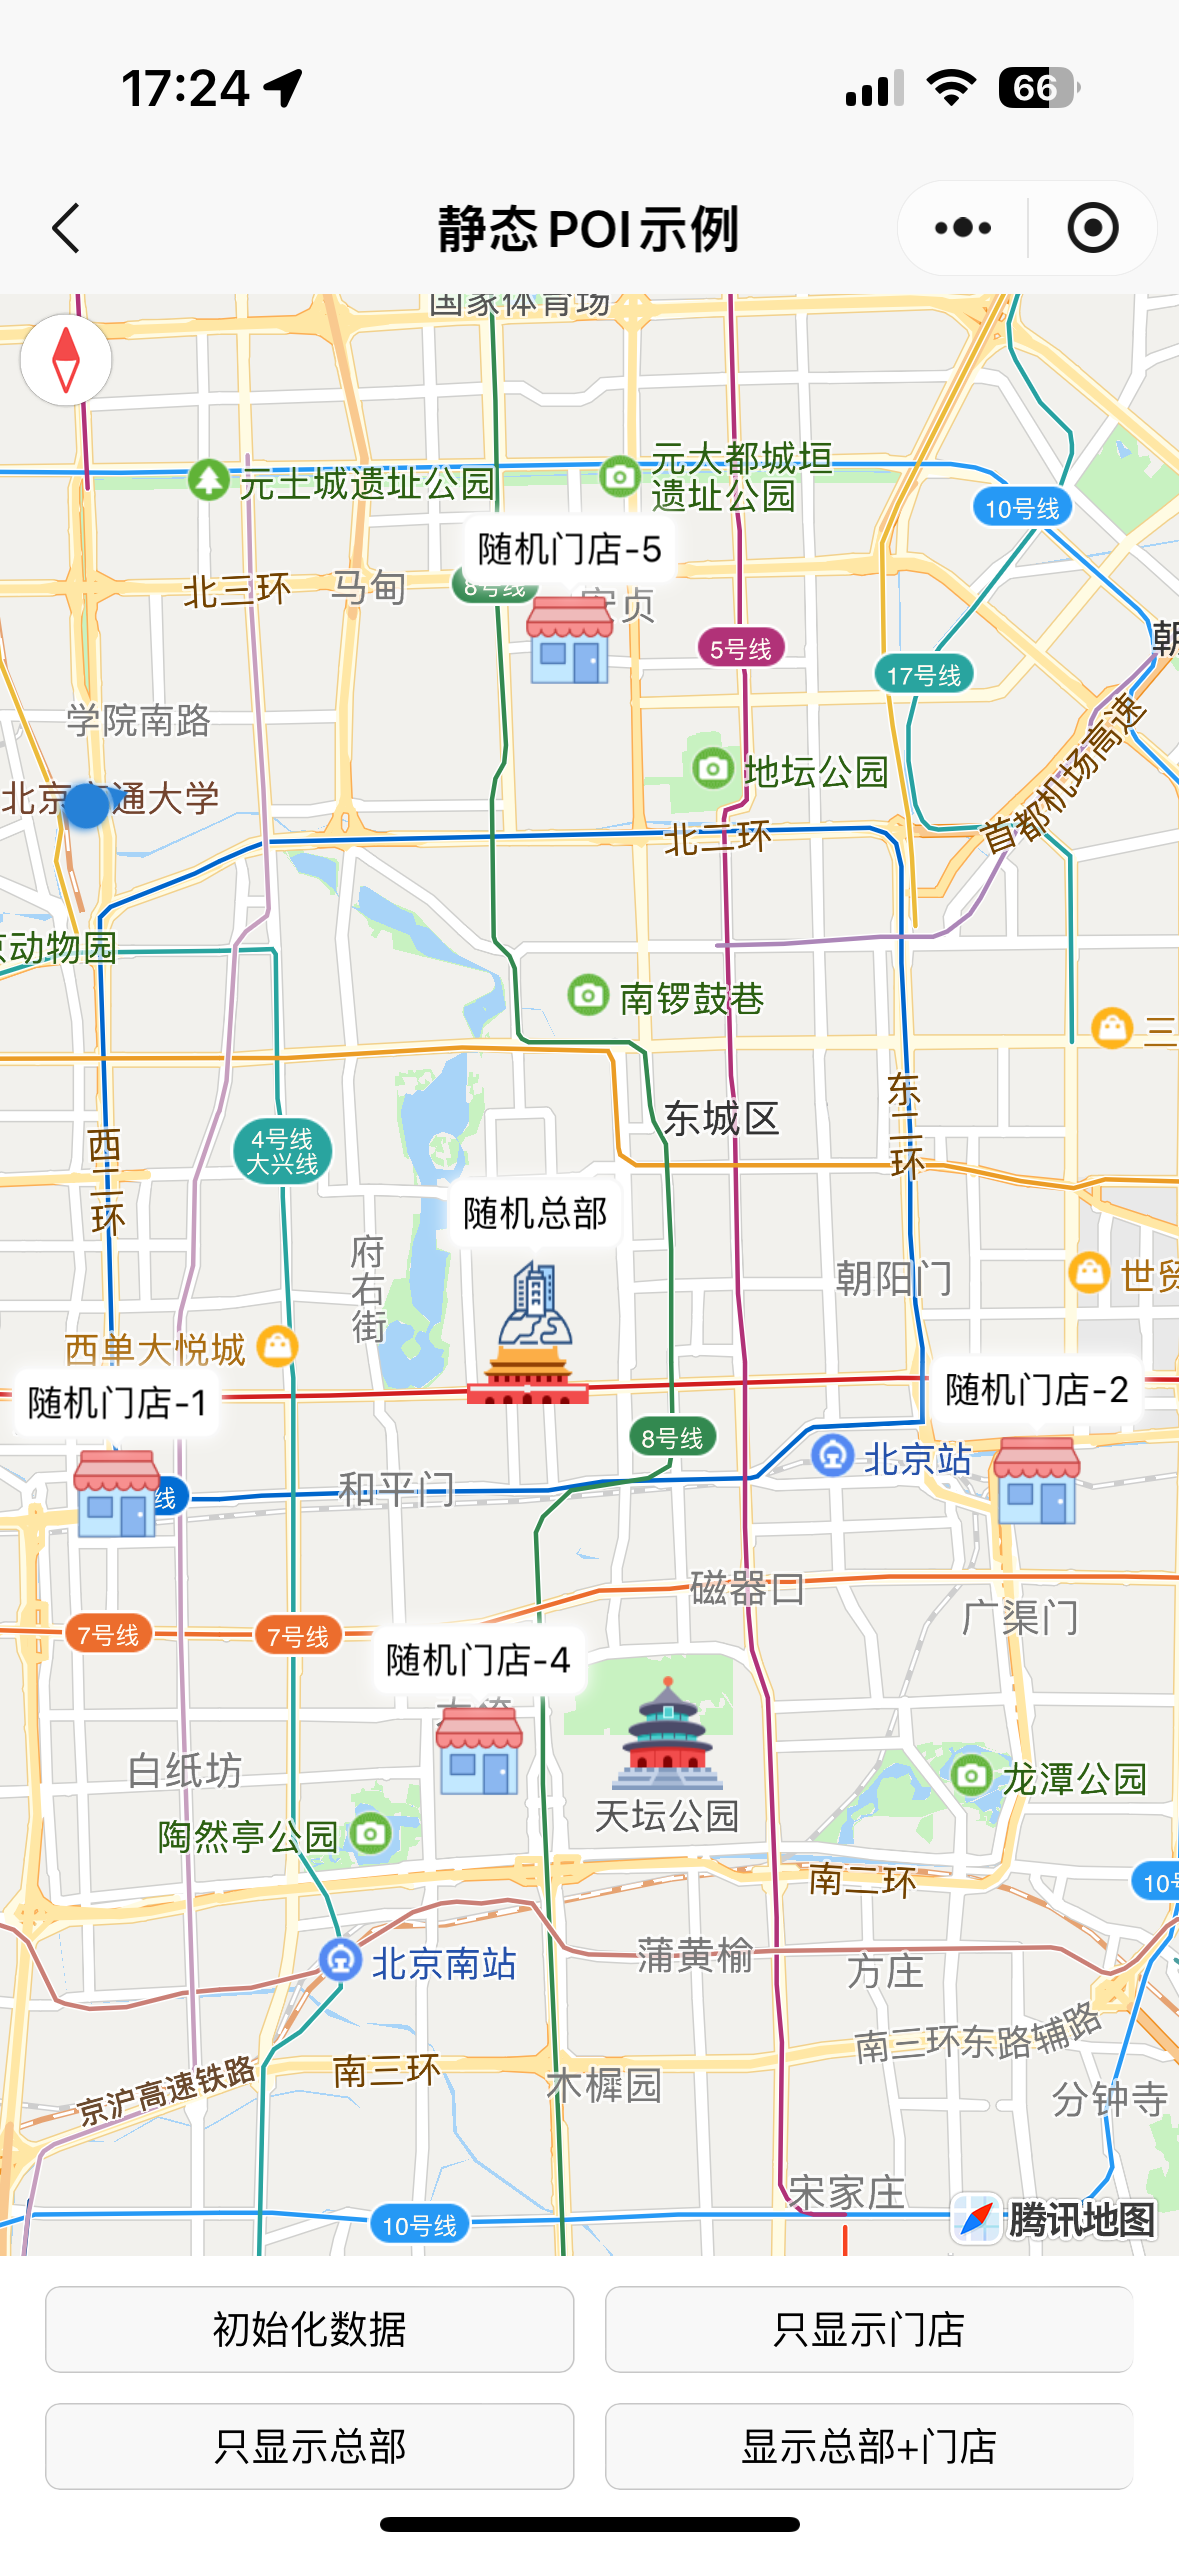
- 显示静态POI信息。比如门店位置、景点位置、个人位置、车辆位置、活动举办地点等静态POI
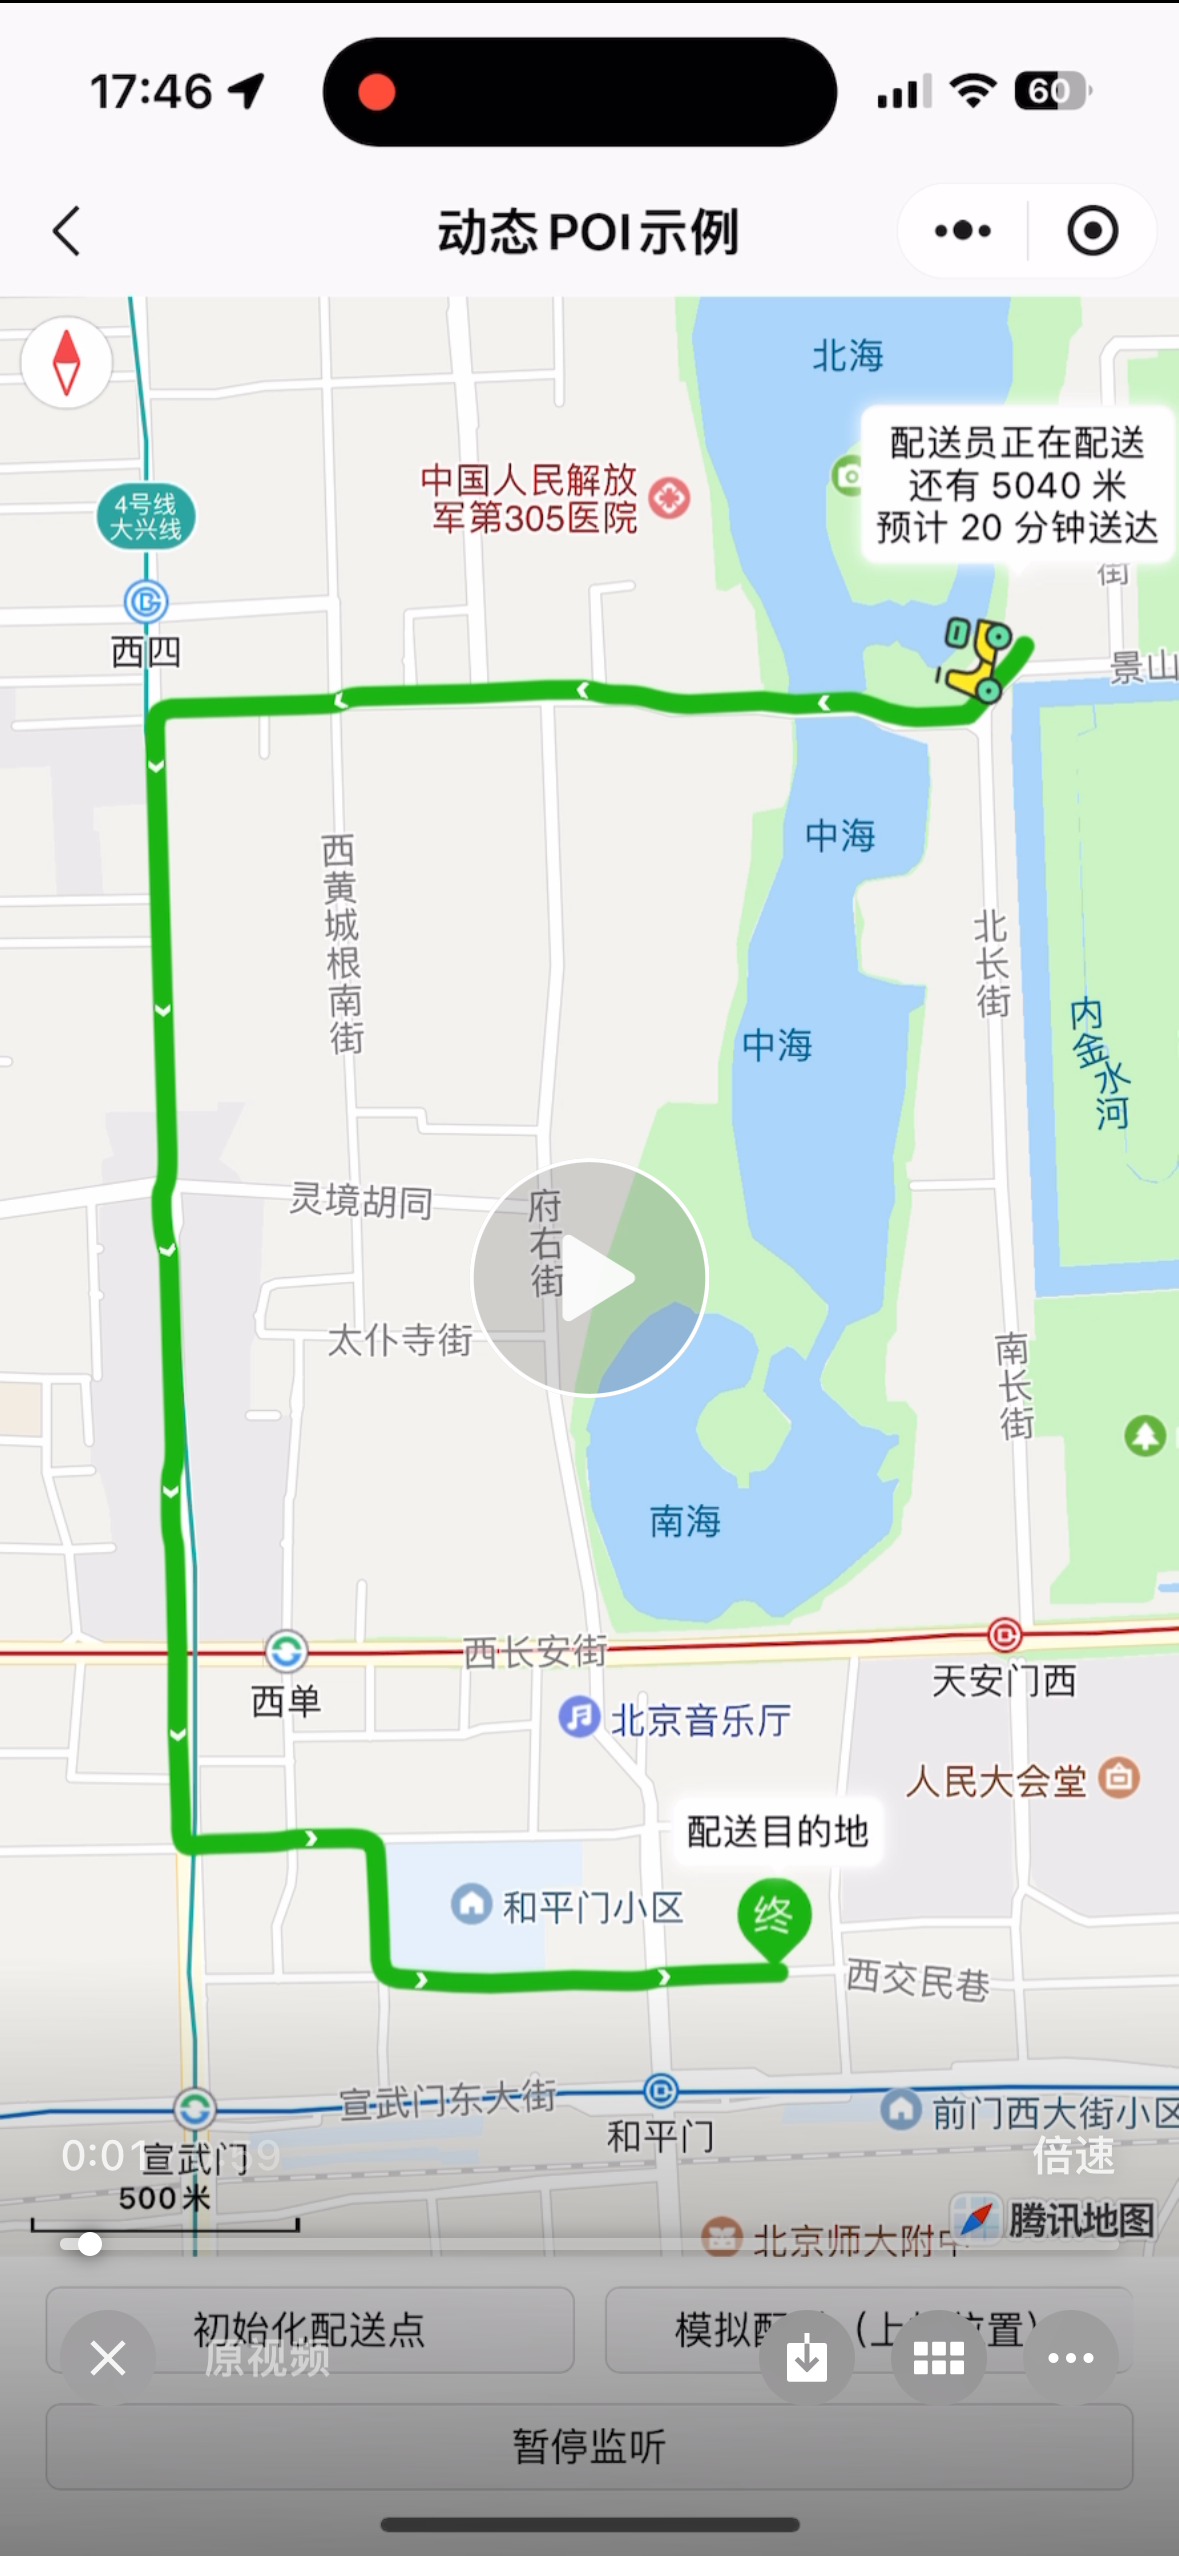
- 显示动态POI信息和路径。比如外卖软件显示外卖员实时配送路线、打车软件显示司机到乘客上车点的实时路线
- 更多基于自定义POI实现的功能
交流群:uni-map交流群
# 用法示例
# 简易示例
注意:由于组件是读取数据库表opendb-poi进行查询,若表不存在或表内没有POI数据,则不会显示POI,可以通过unicloud-map-admin插件管理POI信息
<template>
	<view>

		<unicloud-map
			ref="map"
			:where="where"
			:width="700"
			:height="900"
			:latitude="latitude"
			:longitude="longitude"
			:default-icon="defaultIcon"
			:custom-icons="customIcons"
		></unicloud-map>

	</view>
</template>

<script>
export default {
	data() {
		return {
			// 查询条件
			where:{

			},
			// 你的经纬度,可通过uni.getLocation获取,注意type需传gcj02,同时在电脑端运行时获取到的经纬度是不准的
			latitude: 39.908823,
			longitude: 116.39747,
			defaultIcon: "/static/icon/default.png", // 默认POI图标
			// 自定义POI图标
			customIcons: [
				{ type: "门店", icon: "/static/icon/shop.png" },
				{ type: "总部", icon: "/static/icon/headquarters.png" }
			]
		}
	}
}
</script>
# 渲染静态POI
通过从数据库获取POI数据,渲染到地图上
运行效果图
示例代码
注意:此代码如果运行在APP中,需要使用nvue模式
<template>
	<view class="page">

		<unicloud-map
			ref="map"
			:debug="false"
			loadtime="auto"
			collection="opendb-poi"
			:where="where"
			:width="750"
			:height="heightCom"
			:latitude="latitude"
			:longitude="longitude"
			:scale="13"
			:poi-maximum="100"
			:default-icon="defaultIcon"
			:custom-icons="customIcons"
			:enable-scroll="true"
			:enable-zoom="true"
			:show-compass="true"
			@poitap="poitap"
		></unicloud-map>

		<view class="btn-box first">
			<button @click="initData" size="mini" class="btn">初始化数据</button>
			<button @click="show1" size="mini" class="btn">只显示门店</button>
		</view>
		<view class="btn-box">
			<button @click="show2" size="mini" class="btn">只显示总部</button>
			<button @click="show3" size="mini" class="btn">显示总部+门店</button>
		</view>

	</view>
</template>

<script>
	var timer;
	const uniMapCo = uniCloud.importObject('uni-map-co', {
		customUI: true
	});
	const db = uniCloud.database();
	const _ = db.command;
	const category = "static-001";
	export default {
		data() {
			return {
				latitude: 39.908823,
				longitude: 116.39747,
				where: {
					category: category
				}, // 查询条件,不支持字符串JQL形式,必须是对象形式
				defaultIcon: "/static/icon/default.png", // 默认图标
				// 自定义图标
				customIcons: [
					{ type: "门店", icon: "/static/icon/shop.png" },
					{ type: "总部", icon: "/static/icon/headquarters.png" }
				]
			}
		},
		onLoad() {

		},
		methods: {
			// 初始化测试数据
			async initData() {
				uni.showLoading({
					title: "生成中...",
					mask: true
				});
				try {
					await uniMapCo.initStatic001();
					await this.refresh();
				} catch (err) {}
				uni.hideLoading();
			},
			// 只显示门店
			show1() {
				this.where = {
					category: category,
					type: "门店"
				};
			},
			// 只显示总部
			show2() {
				this.where = {
					category: category,
					type: "总部"
				};
			},
			// 显示门店+总部
			show3() {
				this.where = {
					category: category,
					type: _.in(["门店", "总部"])
				};
			},
			// 刷新地图
			async refresh() {
				await this.$refs.map.refresh({
					needIncludePoints: true
				});
			},
			// 监听 - 点击POI事件
			poitap(e) {
				let { poi } = e;
				this.showActionSheet(poi);
			},
			// 导航弹窗
			showActionSheet(poi) {
				let itemList = ["导航到这里"];
				uni.showActionSheet({
					title: poi.title,
					itemList: itemList,
					success: (res) => {
						let item = itemList[res.tapIndex];
						if (item === "导航到这里") {
							uni.openLocation({
								type: 'gcj02',
								latitude: poi.location.coordinates[1],
								longitude: poi.location.coordinates[0],
								name: poi.title,
								address: poi.address
							});
						}
					}
				});
			}
		},
		computed: {
			heightCom() {
				let systemInfo = uni.getSystemInfoSync();
				return `${systemInfo.windowHeight - 100}px`;
			}
		}
	}
</script>

<style lang="scss" scoped>
	.page{
		.btn-box{
			margin: 10px;
			/* #ifndef APP-NVUE */
			display: flex;
			/* #endif */
			flex-direction: row;
			.btn{
				flex: 1;
				margin: 0 5px;
			}
			&.first{
				margin: 10px 10px 0 10px;
			}
		}
	}
</style>
# 渲染动态POI
通过从数据库获取POI数据,并通过公共模块 uni-map-common 内的路线规划API,计算路线、距离、时间
运行效果图
示例代码
注意:此代码如果运行在APP中,需要使用nvue模式
<template>
	<view class="page">

		<unicloud-map
			ref="map"
			:debug="false"
			loadtime="auto"
			collection="opendb-poi"
			:where="where"
			:width="750"
			:height="heightCom"
			:latitude="latitude"
			:longitude="longitude"
			:scale="13"
			:poi-maximum="100"
			:default-icon="defaultIcon"
			:custom-icons="customIcons"
			:enable-scroll="true"
			:enable-zoom="true"
			:show-compass="true"
			:show-location="true"
		></unicloud-map>

		<view class="btn-box first">
			<button @click="initData" size="mini" class="btn">初始化配送点</button>
			<button @click="virtuallyTest" size="mini" class="btn">模拟配送(上报位置)</button>
		</view>
		<view class="btn-box">
			<button @click="start" size="mini" class="btn" v-if="!isStart">开启监听</button>
			<button @click="stop" size="mini" class="btn" v-else>暂停监听</button>
		</view>
	</view>
</template>

<script>

	var timer;

	const uniMapCo = uniCloud.importObject('uni-map-co', {
		customUI: true
	});
	const db = uniCloud.database();
	const _ = db.command;
	const category = "dynamics-001";

	export default {
		data() {
			return {
				longitude: 116.39747,
				latitude: 39.908823,
				where: {
					category: category
				},
				defaultIcon: "/static/icon/default.png", // 默认图标
				// 自定义图标
				customIcons:[
					{ type: "配送员", icon: "/static/icon/delivery.png" },
					{ type: "目的地", icon: "/static/icon/to.png" }
				],
				isStart: false,
				polyline:[],
				isReady: false,
				updateNum: 0
			}
		},
		onLoad() {

		},
		onUnload() {
			this.stop();
		},
		methods: {
			async initData(){
				let res = await uniMapCo.initDynamics001();
				await this.refresh();
				this.setPolyline(res.polyline);
			},
			// 虚拟配送测试
			async virtuallyTest() {
				// 启动监听
				this.start();
				// 先执行一次刷新,获得配送路线
				await this.refresh();
				const sleep = ms => new Promise(resolve => setTimeout(resolve, ms));
				let polyline = JSON.parse(JSON.stringify(this.polyline))
				if (polyline && polyline.length > 0) {
					// 去除重复的点
					let points = polyline[0].points;
					for (let i = 0; i < points.length - 1; i++) {
						let item = points[i];
						let nextItem = points[i + 1];
						if (item.latitude == nextItem.latitude && item.longitude == nextItem.longitude) {
							points.splice(i, 1);
							i--;
						}
					}
					let length = points.length;
					for (let i = 0; i < length; i++) {
						// 为了更快的显示变化,这里加速显示
						let rate = 5;
						if ((length - 1) > (i + rate)) {
							i = i + rate;
						} else {
							i = length - 1;
						}
						if (!this.isStart) {
							break;
						}
						let item = points[i];
						await sleep(500); // 模拟停顿
						// 模拟上报当前的坐标
						await uniMapCo.updateMyLocation({
							longitude: item.longitude,
							latitude: item.latitude,
						});
					}
				}
			},
			// 刷新地图
			async refresh() {
				if (this.updateNum % 5 == 0) {
					await this.getPolyline();
				}
				this.updateNum++;
				await this.$refs.map.refresh({
					needIncludePoints: true
				});
			},
			// 获取路线
			async getPolyline() {
				let res = await uniMapCo.getPolyline();
				if (res.end) {
					this.stop();
					this.setPolyline([]);
				} else {
					this.setPolyline(res.polyline);
				}
			},
			// 开启监听
			start() {
				this.isStart = true;
				if (timer) clearInterval(timer);
				timer = setInterval(() => {
					this.refresh();
				}, 1000);
			},
			// 停止监听
			stop() {
				this.isStart = false;
				if (timer) clearInterval(timer);
			},
			// 设置路线
			setPolyline(polyline){
				this.polyline = polyline;
				this.$refs.map.setPolyline(polyline);
			}
		},
		computed: {
			heightCom() {
				let systemInfo = uni.getSystemInfoSync();
				return `${systemInfo.windowHeight - 100}px`;
			}
		}
	}
</script>

<style lang="scss" scoped>
	.page{
		.btn-box{
			margin: 10px;
			/* #ifndef APP-NVUE */
			display: flex;
			/* #endif */
			flex-direction: row;
			.btn{
				flex: 1;
				margin: 0 5px;
			}
			&.first{
				margin: 10px 10px 0 10px;
			}
		}
	}
</style>
# 地图Key配置
地图Key需要在两个地方进行配置:前端配置和云端配置(必须都配置)。
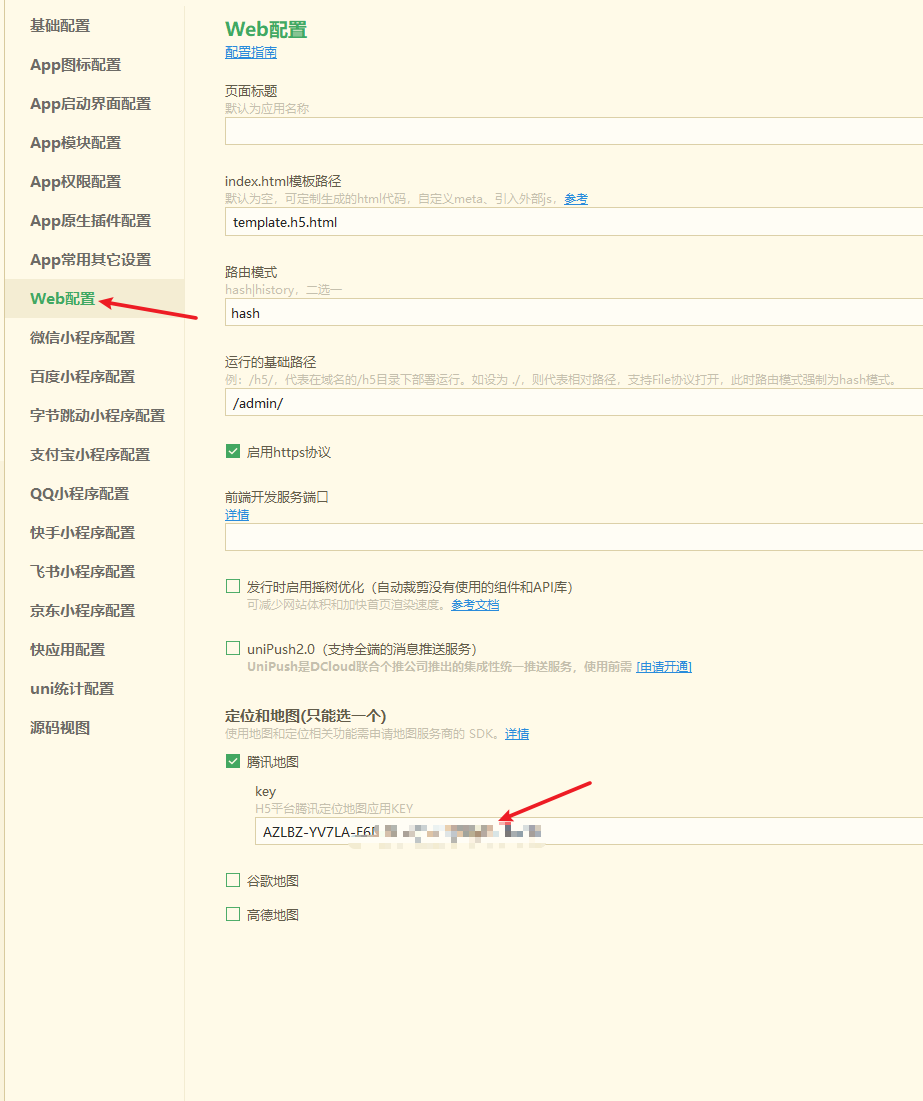
前端配置Key:
在 manifest.json 文件中点击 Web 配置,选择并配置腾讯地图或高德地图中的任意一个即可。
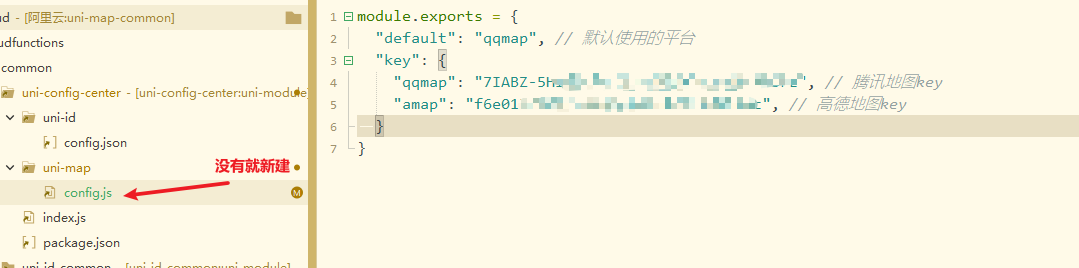
云端配置Key:
在 uni-config-center/uni-map/config.js 中进行配置。(没有配置文件和目录就新建目录和文件)
config.js 文件内容
module.exports = {
	"default": "qqmap", // 使用的平台
	"key": {
		"qqmap": "", // 腾讯地图key
		"amap": "", // 高德地图key
	}
}
# 组件属性
| 属性名 | 说明 | 类型 | 默认值 | 可选值 | 平台差异说明 | |
|---|---|---|---|---|---|---|
| collection | 表名 | string | opendb-poi | - | - | |
| loadtime | 数据加载时机 | string | auto | 详情 | - | |
| where | 查询条件,注意,只支持对象写法,不支持JQL的字符串语法 | object | - | - | - | |
| poi-maximum | 最大poi显示数量 | number | 100 | - | - | |
| poi-max-distance | 查询的最大距离 | number | - | - | - | |
| poi-min-distance | 查询的最小距离 | number | - | - | - | |
| width | 地图的宽度(不要设置百分比,必须直接写量,比如750rpx) | number、string | - | - | - | |
| height | 地图的高度(不要设置百分比,必须直接写量,比如750rpx) | number、string | - | - | - | |
| default-icon | 默认的POI图标 | string | /static/location.png | - | - | |
| custom-icons | 自定义图标,根据POI的type来区分 | Array | - | - | - | |
| poi-title-format | 自定义poi标题的格式化函数 | function | - | - | - | |
| latitude | 中心纬度 | number、string | - | - | - | |
| longitude | 中心经度 | number、string | - | - | - | |
| defaultLatitude | 默认中心纬度,当latitude无值时使用该值 | number、string | 39.908823 | - | - | |
| defaultLongitude | 默认中心经度,当longitude无值时使用该值 | number、string | 116.39747 | - | - | |
| scale | 地图缩放等级,部分情况下会自动设置,此参数会失效 | number | 16 | - | 高德地图缩放比例与微信小程序不同 | |
| min-scale | 最小缩放等级 | number | 3 | - | App-nvue 3.1.0+、微信小程序2.13+ | |
| max-scale | 最大缩放等级 | number | 20 | - | App-nvue 3.1.0+、微信小程序2.13+ | |
| layer-style | 个性化地图 | number、string | 1 | - | App-nvue 3.1.0+、微信小程序2.13+ | |
| show-compass | 是否显示指南针 | boolean | true | true、false | App-nvue 2.1.5+、微信小程序2.3.0 | |
| enable-zoom | 是否支持缩放 | boolean | true | true、false | App-nvue 2.1.5+、微信小程序2.3.0 | |
| enable-scroll | 是否支持拖动 | boolean | true | true、false | App-nvue 2.1.5+、微信小程序2.3.0 | |
| enable-rotate | 是否支持旋转 | boolean | false | true、false | App-nvue 2.1.5+、微信小程序2.3.0 | |
| enable-overlooking | 是否开启俯视 | boolean | false | true、false | App-nvue 2.1.5+、微信小程序2.3.0 | |
| enable-satellite | 是否开启卫星图 | boolean | false | true、false | App-nvue 2.1.5+、微信小程序2.7.0 | |
| enable-traffic | 是否开启实时路况 | boolean | false | true、false | App-nvue 2.1.5+、微信小程序2.7.0 | |
| enable-poi | 是否展示地图的原生 POI 点(非数据库内的POI点) | boolean | true | true、false | App-nvue 3.1.0+ | |
| enable-building | 是否展示建筑物 | boolean | true | true、false | App-nvue 3.1.0+ 支持 (废除原enable-3D属性 高德地图默认开启建筑物就是3D无法设置) | |
| show-location | 显示带有方向的当前定位点 | boolean | true | true、false | 微信小程序、H5、百度小程序、支付宝小程序、京东小程序 | |
| polygons | 多边形 | boolean | false | true、false | App-nvue 2.1.5+、App-vue 3.4.3+、H5 3.4.3+、微信小程序、百度小程序 | |
| enable-indoor-map | 是否展示室内地图 | boolean | false | true、false | App-nvue 3.1.0+ | |
| @mounted | 组件挂载完毕触发 | EventHandle | - | - | - | |
| @poitap | 点击自定义POI点时触发 | EventHandle | - | - | - | |
| @markertap | 点击标记点时触发 | EventHandle | - | - | App-nvue 2.3.3+、H5、微信小程序、支付宝小程序 (App和H5平台需要指定 marker 对象属性 id) | |
| @labeltap | 点击标记点时触发 | EventHandle | - | - | 微信小程序2.9.0 | |
| @callouttap | 点击标记点对应的气泡时触发 | EventHandle | - | - | - | |
| @controltap | 点击控件时触发 | EventHandle | - | - | - | |
| @regionchange | 视野发生变化时触发 | EventHandle | - | - | 视野发生变化时触发 | 微信小程序、H5、百度小程序、支付宝小程序、京东小程序 |
| @tap | 点击地图时触发; App-nvue、微信小程序2.9支持返回经纬度 | EventHandle | - | - | 点击地图时触发; App-nvue、微信小程序2.9支持返回经纬度 | |
| @updated | 在地图渲染更新完成时触发 | EventHandle | - | - | 在地图渲染更新完成时触发 | 微信小程序、H5、百度小程序 |
| @anchorpointtap | 点击定位标时触发 | EventHandle | - | - | App-nvue 3.1.0+、微信小程序2.13+ | |
| @native-poitap | 点击地图原生POI点时触发 | EventHandle | - | - | 微信小程序2.3.0+ |
注意
- 只支持腾讯地图或高德地图,且需使用
gcj02坐标,用错坐标类型会显示偏移。
# loadtime
| 值 | 类型 | 描述 |
|---|---|---|
| auto | String | 页面就绪后或属性变化后加载数据,默认为auto |
| onready | String | 页面就绪后不自动加载数据,属性变化后加载。适合在onready中接收上个页面的参数作为where条件时。 |
| manual | String | 手动模式,不自动加载数据。如果涉及到分页,需要先手动修改当前页,在调用加载数据 |
# 组件方法
| 方法名 | 说明 |
|---|---|
| refresh | 主动刷新POI数据 |
| getMarkers | 获取组件内的markers |
| setMarkers | 设置组件内的markers |
| getPolyline | 获取组件内的polyline |
| setPolyline | 设置组件内的polyline |
| getCircles | 获取组件内的circles |
| setCircles | 设置组件内的circles |
| getControls | 获取组件内的controls |
| setControls | 设置组件内的controls |
注意
使用这些方法前,需要在组件先声明 ref="map"
<unicloud-map
	ref="map"
	...其他属性
</unicloud-map>
refresh
主动刷新POI数据
示例
await this.$refs.map.refresh();
getMarkers
获取组件内的markers
示例
let markers = this.$refs.map.getMarkers();
console.log('markers: ', markers);
setMarkers
设置组件内的markers,用法与内置组件的map一致,点击查看详情
示例
this.$refs.map.setMarkers(markers);
getPolyline
获取组件内的polyline
示例
let polyline = this.$refs.map.getPolyline();
console.log('polyline: ', polyline);
setPolyline
设置组件内的polyline,用法与内置组件的map一致,点击查看详情
示例
this.$refs.map.setPolyline(polyline);
getCircles
获取组件内的circles
示例
let circles = this.$refs.map.getCircles();
console.log('circles: ', circles);
setCircles
设置组件内的circles ,用法与内置组件的map一致,点击查看详情
示例
this.$refs.map.setCircles(circles);
getControls
获取组件内的controls
示例
let controls = this.$refs.map.getControls();
console.log('controls: ', controls);
setControls
设置组件内的controls,用法与内置组件的map一致,点击查看详情
示例
this.$refs.map.setControls(controls);
# unicloud-map的opendb数据表
unicloud-map需要创建以下表后才能正常运行,可以右键插件database目录下的opendb-poi.schema.json上传Schema
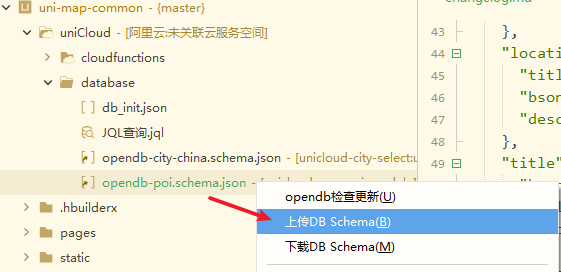
- 地图POI表 opendb-poi
# 三方定位和地图服务收费说明
unicloud-map是免费的,但高德、腾讯、百度等地图的使用需向地图厂商采购商业授权。DCloud与地图厂商达成合作,可更优惠的给开发者提供地图服务。详见